 TraceFind
OSINT Investigation Workflow: One Email to a Full Picture
A customer reports someone emailing from jane.doe@example.com and claiming to work for you. All you have is that address. Here is the workflow we use to turn one identifier into a verified, documented answer, shown on a fictional case from intake to report.
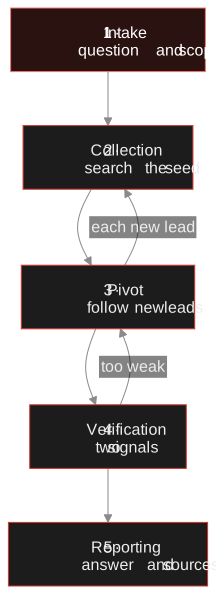
- An investigation has five stages: intake, collection, pivot, verification, reporting. Pivot and verification repeat until the question is answered.
- Write the question and your lawful basis down before the first search. It keeps the case proportionate.
- Only pivot on a link you have verified with two independent signals. A shared handle alone is a hint.
- Put every finding on a graph with its source, time and confidence. Missing links are findings too.
- The report states the answer first, then the evidence, in neutral wording.
The scenario
A small company's security team gets a report: someone writing from jane.doe@example.com has been contacting customers and claiming to work there. Three questions follow. Is the address linked to other accounts? Does it appear in breaches, which could mean it is a compromised address rather than an impostor's own? And is there a wider pattern worth reporting to the platforms involved?
Everything below is fictional: the address, the handle jdoe-dev, the domain jdoe.example, the +49 151 00000000 number and the 203.0.113.42 address from the reserved documentation range. The method is what we care about.
Stage 1: Intake, write down the question
Before you open a single tool, put three things on paper: the question, the lawful basis, and where you will stop. Here the question is "does this address belong to the impostor or to someone being impersonated?", the basis is protecting customers from impersonation (a legitimate interest under the GDPR), and the stopping point is an answer to that question, not a biography.
Legal: A written scope is what keeps a case proportionate. It stops an impersonation check from drifting into someone's family, employer or home address. The legal and ethical guide has the full decision flow.
Then name the seed: the one identifier you trust, here the address from the customer report. Note where it came from ("customer report, ticket 4411") because every later finding hangs off this node.
Stage 2: Collection, run the seed
An email search is the natural first move. It covers four things: deliverability (MX and SMTP checks, plus disposable, role-account and catch-all detection), registered accounts across 296 sites, breach exposure across 16B+ records with dates and data types, and public details of a linked Google account where they exist.
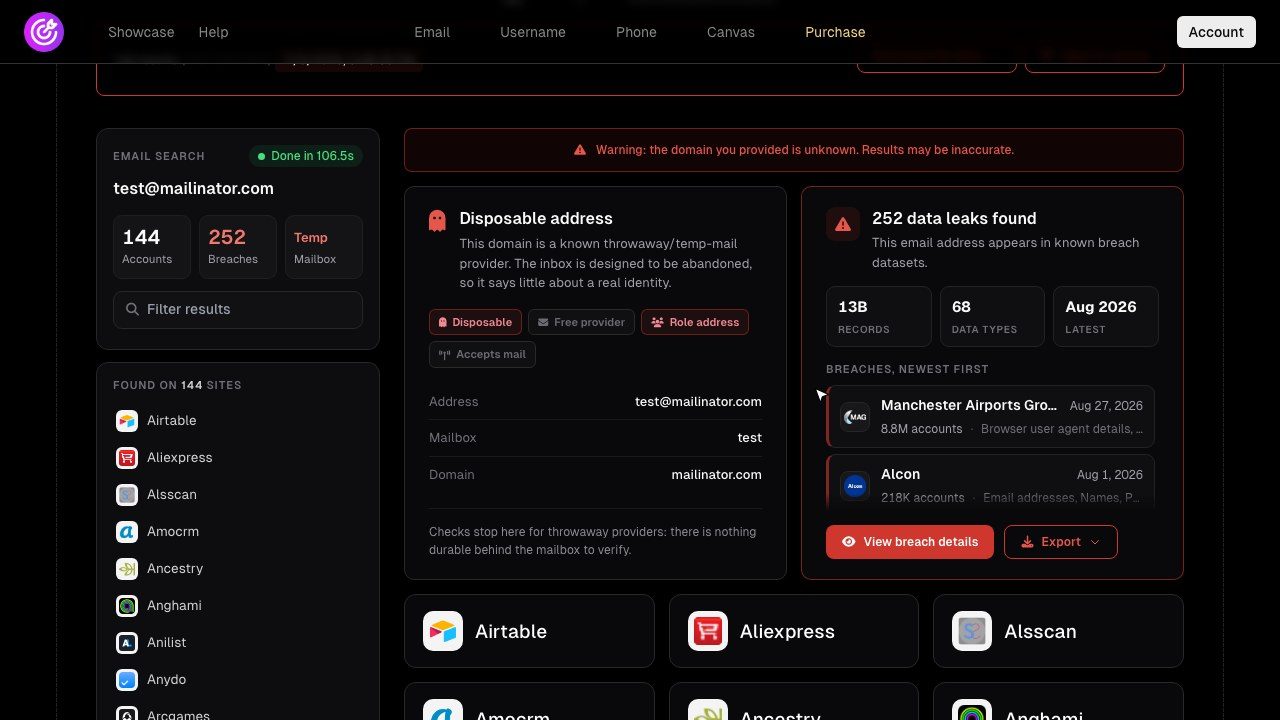
In our case the address is deliverable and not disposable. It is registered on a code host, a forum and a music service, and it appears in two older breaches that exposed email addresses and usernames. One breach record lists the username jdoe-dev. That one line is the lead. Our email OSINT guide explains how to read each of these checks, and how to check an email for breaches covers the breach card.
Stage 3: Pivot to the next identifier
A pivot means taking an identifier out of one result and using it as the input to the next search. Each pivot needs a reason you can state in a sentence. "A breach record pairs this address with this handle" is a reason. "It felt related" is not.
A username search for jdoe-dev returns profiles on several sites. One is on GitHub, which has its own free platform investigation on the canvas (profile, linked sites, other names it goes by). A forum profile under the same handle has a bio that links to jdoe.example, the same site the GitHub bio points to. A free domain lookup then shows the domain's DNS, including an A record that resolves to 203.0.113.42, and its contact page lists +49 151 00000000. A phone search on that number shows what messengers it is registered with and whether it appears on public receive-SMS sites.
Stage 4: Verification, before any pivot counts
The pivots above are tempting precisely because they all point the same way. That is when you slow down. Before a link joins your graph as a fact, it has to survive three questions: is there one signal, is there a second independent signal, and does anything contradict it?
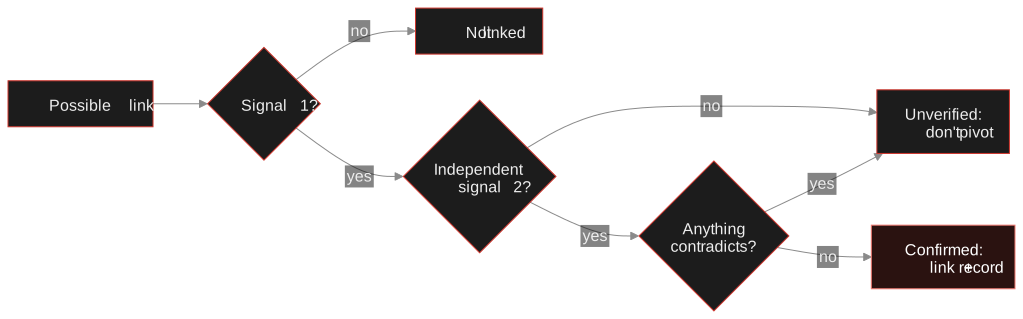
"Independent" is the word that does the work. A username and a display name derived from it count as one signal. The same handle plus a bio that links to the same website is two. In our case the GitHub profile and the forum profile both point at jdoe.example, which is a signal the handle did not generate by itself, so the link holds.
Link analysis: seeing the case as a graph
Lists hide structure. Once the verified findings are on a graph, shapes appear: clusters, single points of failure, branches that connect only through one weak edge.
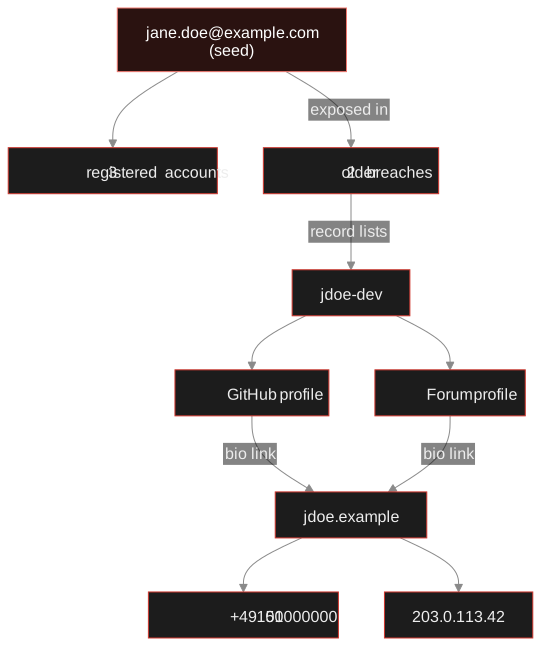
| Entity | Type | Linked to | Evidence |
|---|---|---|---|
| jane.doe@example.com | Seed | Customer report | |
| jdoe-dev | Username | Breach record lists both | |
| GitHub and forum profiles | Accounts | Username | Same handle, profile data |
| jdoe.example | Domain | Both profiles | Both bios link to it |
| +49 151 00000000 | Phone | Domain | Listed on the contact page |
| 203.0.113.42 | IP | Domain | DNS A record |
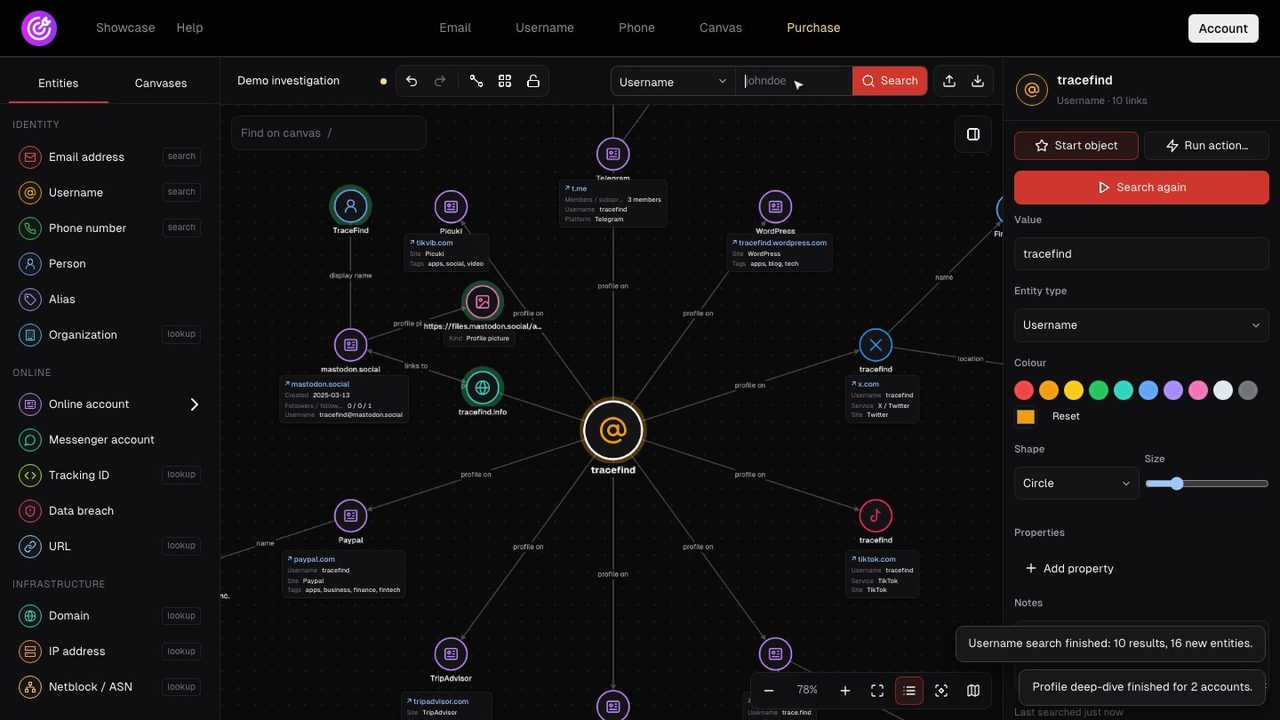
The investigation canvas builds this graph as you search: results land as linked entities, and you add your own links and notes. The canvas tutorial walks through it click by click.
Keep every pivot on one graph TraceFind search results become linked entities on the canvas, with 29 entity types from people and accounts to domains, IPs and wallets.
Open the canvasWhat the graph changed. We started with "impostor or victim?" The graph shows one consistent identity: a developer who has used the same address and handle for years, with a personal site and a stable phone number. The address was in breaches from before the impersonation began.
Revised hypothesis. The messages more likely come from someone spoofing or reusing a real person's address. That makes Jane Doe a possible victim, not a suspect.
What is missing. There is no edge between this identity and the company or its customers. We write that down. Absence of evidence is a finding, too.
Document as you go
An investigation that someone else cannot check is not finished. For every entity and link, record four things.
- Source: the URL, or the search that produced it.
- Date and time: when you saw it. Profiles change and pages disappear.
- Capture: a screenshot or an archived copy. The Wayback Machine can archive a public page on request, which gives a third party a way to see what you saw.
- Confidence: confirmed, likely or unverified, and why.
Keep the notes neutral. "Forum profile jdoe-dev links to jdoe.example (captured 2026-10-21)" beats "suspect's forum account". Words like "suspect" bake a conclusion into the evidence before you have earned it.
Stage 5: Report and decide
When the question is answered, write the report so that the first paragraph is enough for a busy reader: the question, the answer and the confidence. Then show the graph, then the evidence for each link. You can export the canvas as a high-resolution PNG for the report, or as a canvas file to archive the case.
In our case the summary says the reported address belongs to an unrelated private individual whose address appeared in older breaches. It recommends warning customers about spoofed sender addresses and reporting the impersonation messages to the email provider, rather than acting against the address owner.
Mistakes to avoid
- Require two independent signals before joining branches
- Hunt for evidence that would disprove your hypothesis
- Stay inside the question you wrote down
- Stay passive: read, check, look up
- Pivot on a shared common handle alone
- Collect family, employers or addresses "for context"
- Message the subject or join their private groups
- Try to log in to accounts, ever
Confirmation bias deserves a second look because it feels like momentum. When every result agrees with your theory, ask what you would expect to see if the theory were wrong, and go and look for that.
Frequently asked questions
What does pivoting mean in OSINT?
Pivoting means using a new identifier found in one result, such as a username in a breach record or a phone number on a website, as the input for the next search. Each pivot should be backed by evidence that links it to the previous identifier.
Why use a canvas instead of a spreadsheet?
A graph shows how entities connect, which makes it easier to see clusters, single points of failure and missing links. On TraceFind, search results become linked entities automatically, and the finished graph can be exported as a high-resolution PNG or a canvas file.
How should I document sources in an investigation?
For each finding, record the source URL or search, the date and time you saw it, a screenshot or archived copy, and your confidence level with the reason. Keep the wording neutral and avoid labels that assume a conclusion.
Do I need a legal basis to run an OSINT investigation on someone?
If you process personal data for professional purposes, laws such as the GDPR generally require a lawful basis, for example a legitimate interest in fraud prevention or security, plus a clear purpose and proportionate scope. Check the rules that apply where you operate.
How many signals do I need before I link two accounts?
Two independent ones. A matching username is one signal. A matching username plus a bio that links to the same website, or the same profile photo, is two. If anything contradicts the link, treat it as unverified.
When is an investigation finished?
When you can answer the question you wrote at intake, with sources and a confidence level. If you are collecting things that do not change the answer, stop.
Keep reading
-
 Guides
Is OSINT Legal? Ethics and GDPR for Online Investigations
Where the legal and ethical lines run in open source investigations, and the habits that keep your work defensible.
-
 Guides
How to Find Accounts Linked to an Email Address
Pivot from one email to accounts, breaches, usernames and profiles, then grade every finding. With a worked fraud case.
-
 Privacy
How to Check If Your Email Was in a Data Breach
Find out which breaches exposed your email, how to read the results, and the exact steps to take afterward.