 TraceFind
Investigation Canvas Tutorial: Map an Email to a Full Case
Forty rows into a spreadsheet of accounts, you have lost track of which clue led to which. The investigation canvas keeps that structure on the page: every search result becomes a linked entity you can inspect, pivot from, label and export. Here is the whole loop, hands on.
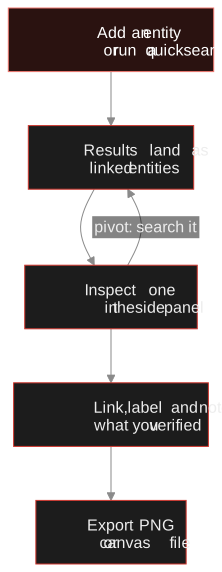
- The canvas is a graph where every search result becomes a linked entity. You search, inspect, pivot, link, then export.
- Email, username and phone searches cost credits (5 per search that finds something, refunded if it finds nothing). Domain, IP, wallet, platform and other lookups are free.
- A new account comes with 15 free credits. Signed out, you can still explore an example canvas.
- You can connect, label, colour and note entities by hand, and see which links are confirmed and which are only inferred.
- Export a high-resolution PNG for a report, or a canvas file to back up or re-import the case.
Why bother with a canvas
Somewhere around the fortieth row, a spreadsheet of accounts stops telling you anything. You know the username came from a breach, but which breach? Was that GitHub profile linked from the website, or the other way round? A graph keeps the how and why on the page: each result sits next to the thing it came from, joined by a line that says what the relationship is.
This tutorial walks through the TraceFind investigation canvas from an empty page to an exported image, using the fictional identity jane.doe@example.com and the handle jdoe-dev. If you want the investigative method behind it, read the investigation workflow first; here we stick to the tool.
-
Open the canvas and sign in
Go to the canvas page. Signed out, it shows a read-only example canvas behind a short sign-up prompt, which is a good way to look around first. Creating a free account gives you 15 free credits, enough for three searches at 5 credits each, and keeps every case saved to your account.
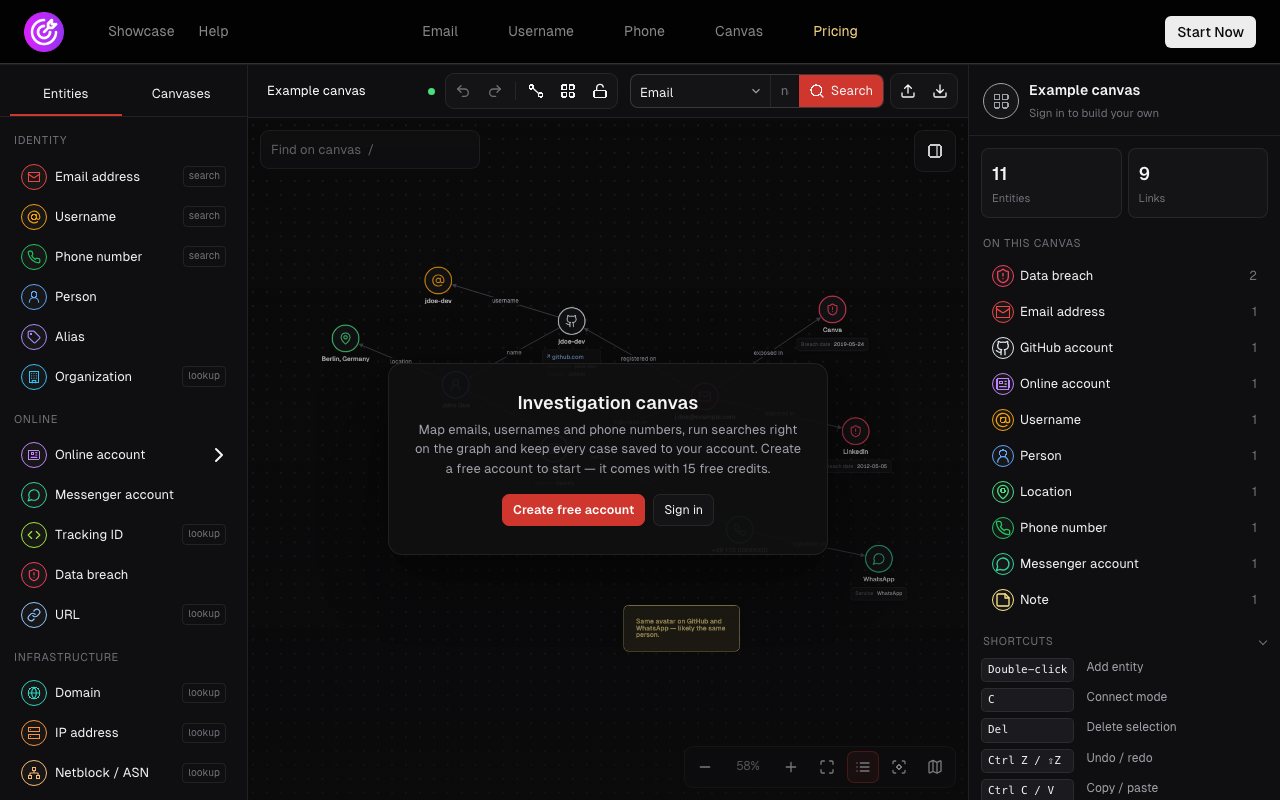
Three areas: the entity palette on the left, the graph with its toolbar in the middle, the inspector on the right. The inspector's counts (11 entities, 9 links) belong to the example canvas. -
Add your seed
Every case starts with something you already have. There are four ways to put it on the canvas:
- Pick the type in the search bar at the top (Email, Username, Phone, Domain and more), type the value and press Search.
- Click an entity in the left panel, or drag it onto the canvas.
- Double-click empty canvas to add an entity there.
- Paste emails, phone numbers, URLs or IPs straight onto the canvas. Pasting handles up to 200 lines at once.
Mark the identifier you trust most as a start object (press S with it selected). Layouts use start objects as anchors, and the hierarchy layout grows outward from them, so the seed stays the root of the case.
-
Know what costs credits
What happens when you run something depends on the entity type. The question to ask is whether you are searching for a person's footprint or looking something up.
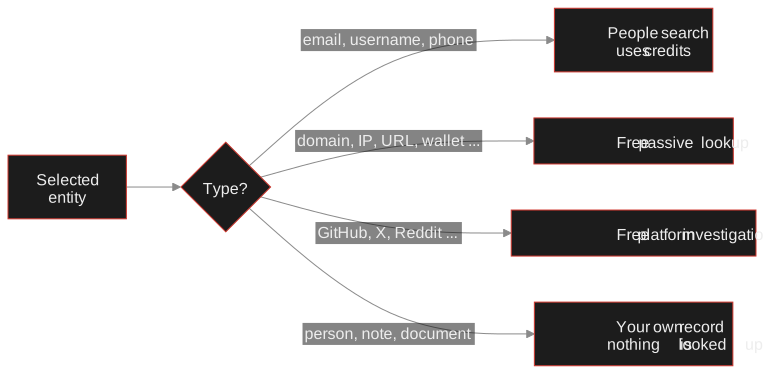
Four kinds of entity. Only the first row spends credits. Searches from the canvas behave like the search pages: 5 credits when a search finds something, nothing charged when it finds nothing. On a free account, results can arrive as a locked preview showing counts only; unlocking needs credits. Up to three searches or lookups can run at once.
Entity types come in five groups (Identity, Online, Infrastructure, Places and money, Evidence), 29 types in all. The ? next to each one in the palette says what it finds.
-
Read what lands
When a search finishes, its results appear as entities around the one you searched, each joined to it by a labelled line such as "profile on" or "exposed in". A toast tells you how many results and new entities came back, and the small card under a node shows its key properties. The toggle in the zoom bar hides those cards when the graph gets busy.
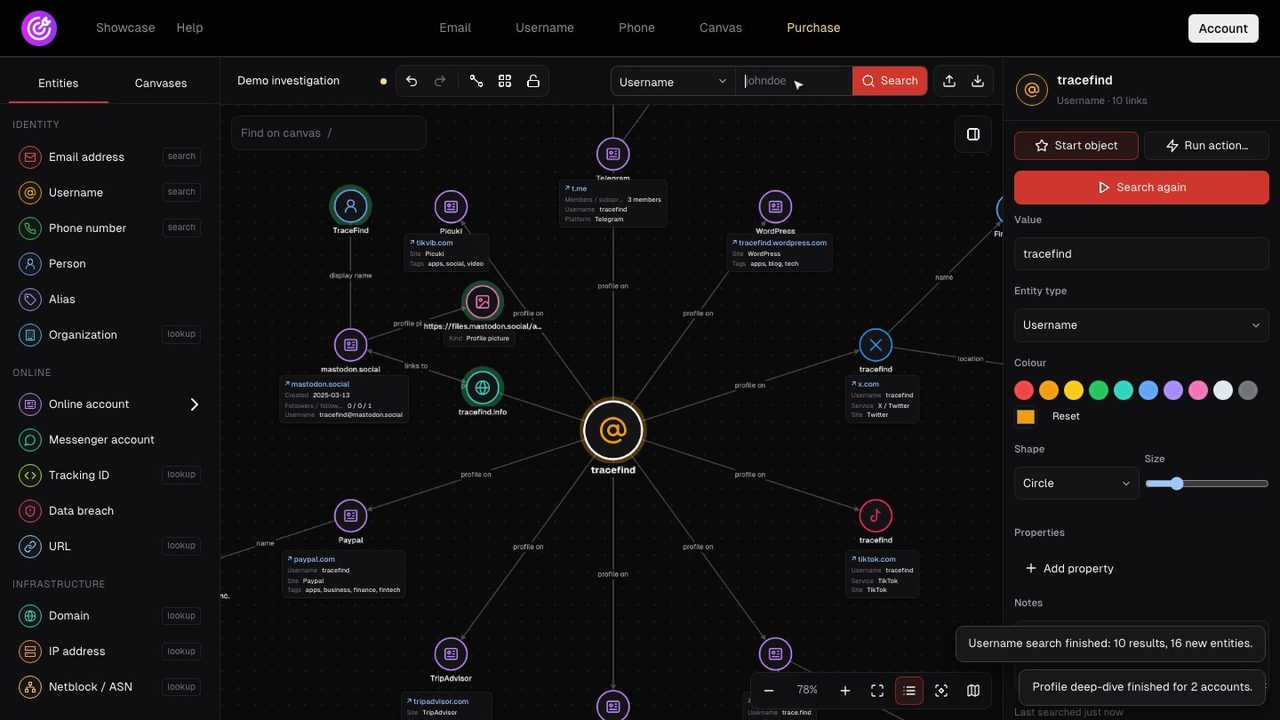
A finished username search on the canvas. This is a public demo search for the TraceFind handle, not our fictional case. -
Inspect one entity
Click a node and the inspector on the right shows everything about it: its value and type, colour, shape and size, a list of properties, and a notes field. For an account it also offers Open profile, so you can read the page itself, and actions to run.
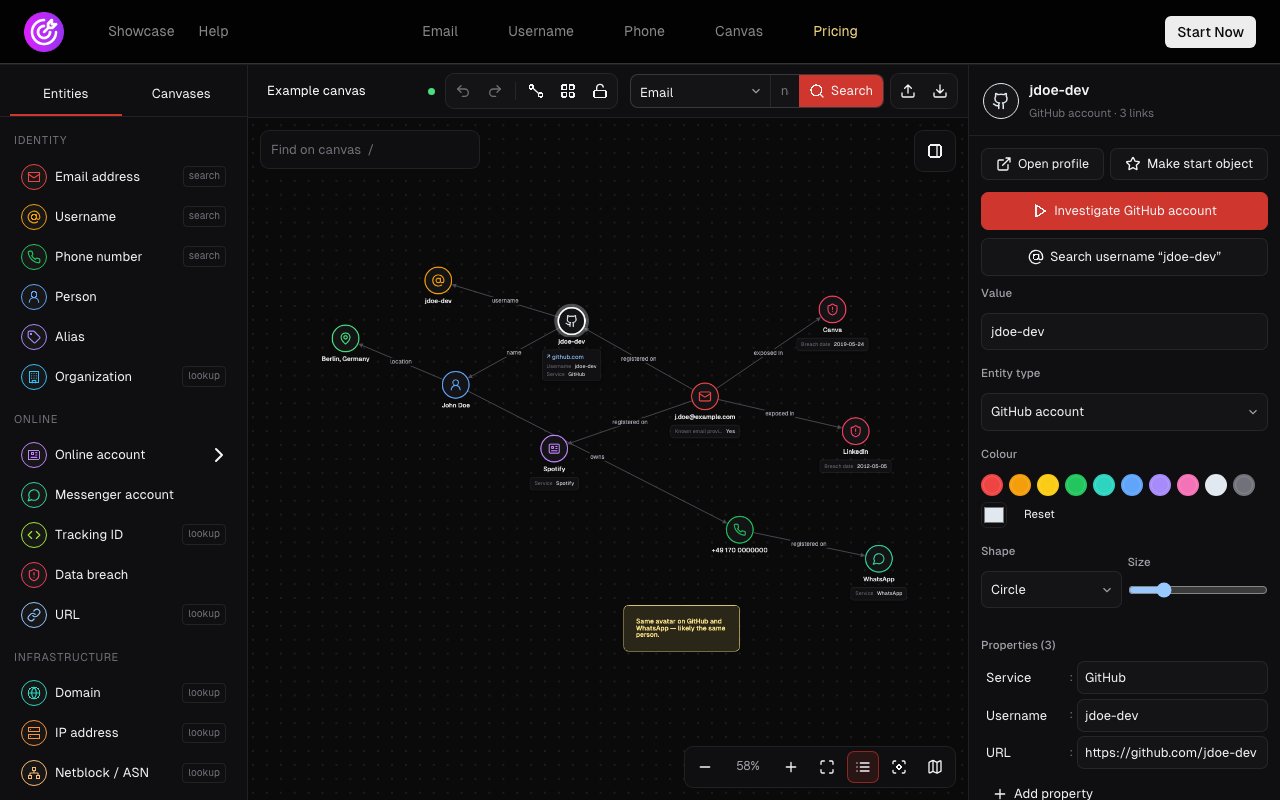
The inspector for a GitHub account entity. Note the two actions at the top: investigate the account itself, or search its username as a new seed. Use the notes field for the source and the date, in the same neutral wording you would put in a report. The canvas autosaves; the indicator next to the canvas name shows when it has.
-
Pivot
The buttons in the inspector are the pivots. A GitHub account can be investigated for free (profile, linked sites, other names it goes by). An account with a username can be searched by that username. A domain gets its own free lookup, which in the demo below added 22 linked entities from 10 sources in one go.
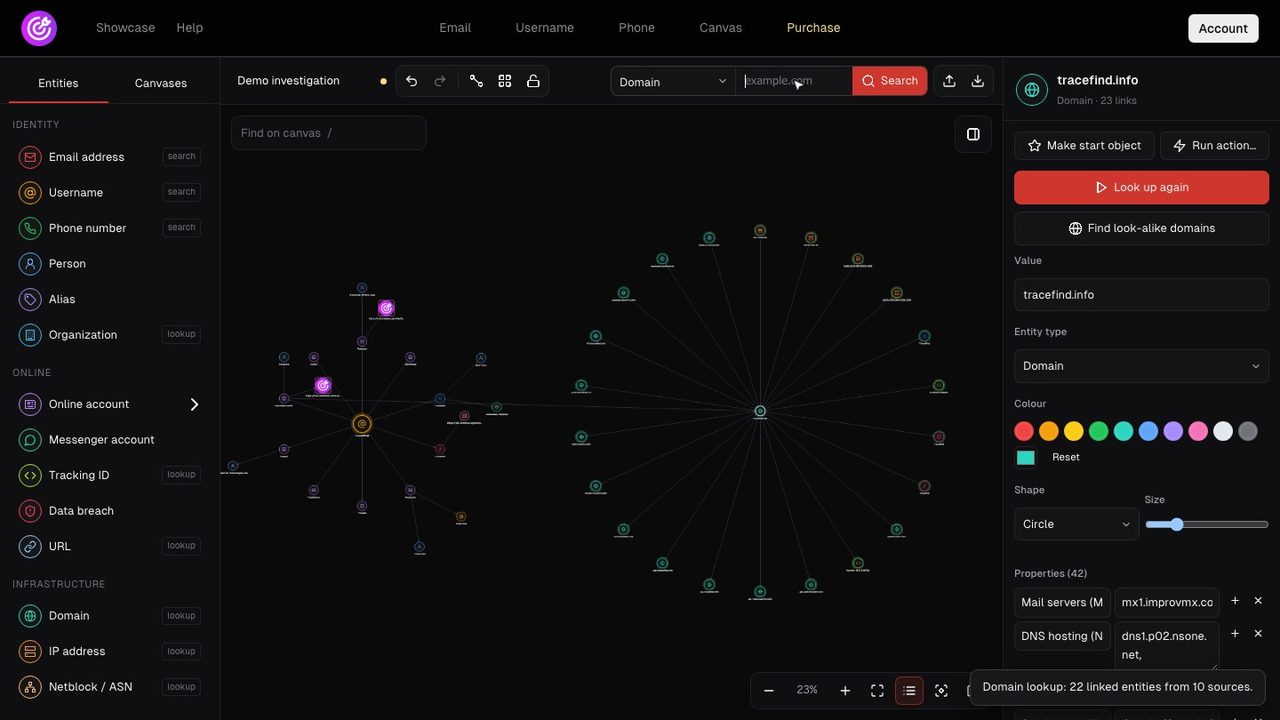
A free domain lookup added a whole cluster at once. Free does not mean unchecked: read the cluster before you accept it. Careful: Every entity the canvas adds is a lead. Before a link counts as a finding, confirm it with a second independent signal, as described in the workflow guide.
-
Link and label
The canvas links what a search finds, but you add the judgement. Press C for connect mode and drag from one entity to another, or use Connect to… in the inspector. Then click the line to name it. The built-in labels cover the usual relationships: linked to, same person, uses, owns, registered on, profile on, exposed in, alias of, works at, located in, communicates with, paid to.
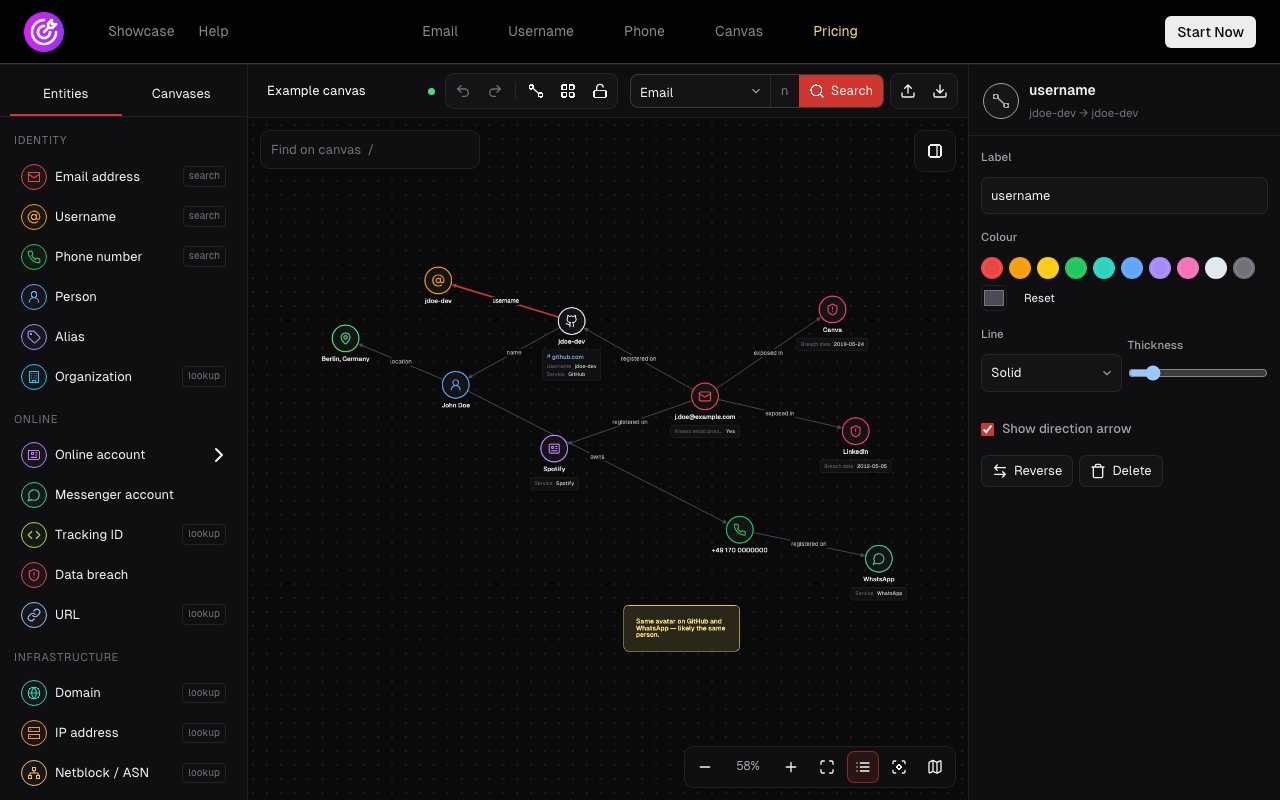
Selecting a link opens its settings: label, colour, line style, thickness, direction arrow, and a button to reverse it. Lookup results also carry how sure the source is. Findings that TraceFind draws from its own reasoning, such as shared infrastructure, are marked inferred and drawn dashed; they are leads to verify, not facts. Records from live DNS, registries or the page itself are confirmed, and third-party records such as archives or passive DNS are reported. The yellow note in the example canvas ("Same avatar on GitHub and WhatsApp, likely the same person") shows a habit worth copying: say why you linked two things.
-
Arrange the graph
Searches arrange themselves, but a case you have to explain needs a deliberate layout. The Arrange menu in the toolbar has force-directed, a tidy-up that keeps your arrangement, hierarchy from the top, radial by links, circle and grid, plus layout settings and a lock.
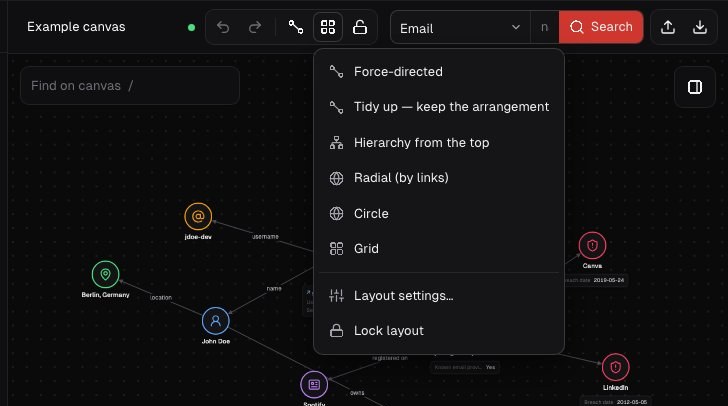
The Arrange menu. Hierarchy from your start object reads well for a case that fans out from one seed. Once the layout is right, lock it so a later search does not rearrange what you have carefully placed. Ctrl+Z undoes a rearrange.
-
Export
The export button offers two things. Image (PNG, high quality) opens a dialog where you pick the resolution (2x for screens, 4x for print, 8x for posters), the background (dark, light or transparent) and the area (whole canvas or current view). Canvas file (JSON) saves the full graph, which you can re-import later or keep as a backup.
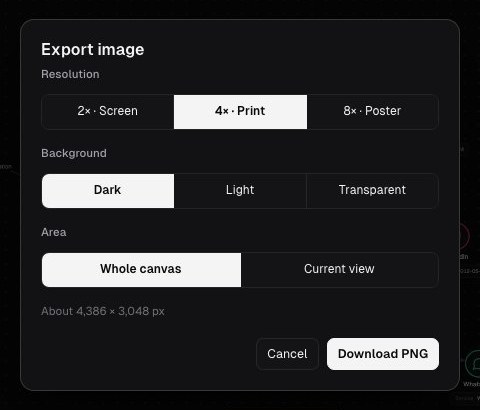
The export dialog shows the pixel size before you download. A light background usually prints better. Individual searches can also produce a PDF report: when one is available, the inspector shows a Download PDF report button on that entity.
Shortcuts worth learning
| Key | Does |
|---|---|
| C | Connect mode |
| S | Start object on or off |
| A | Actions for the selected entity |
| O | Open its profile or link |
| F | Fit the graph to the screen |
| / | Find on canvas |
| Shift-drag | Box select |
| Right-click | More actions |
| Ctrl Z, Ctrl Shift Z | Undo and redo |
| Ctrl E | Export |
For a long list of addresses or numbers, the Bulk button in the toolbar runs a whole list (CSV or pasted) in the background; the bulk search page explains how it works.
Build your first canvas Create a free account, get 15 credits, and start from the one identifier you have. Domain and IP lookups are free.
Open the canvasHabits that keep a case readable
- Set one start object and build outward
- Label every link you add by hand
- Put source and date in notes as you go
- Lock the layout before you export
- Back up the canvas file at milestones
- Treat every auto-added entity as confirmed
- Merge two accounts on a matching handle alone
- Name entities "suspect" or "culprit"
- Keep a case longer than you need it
Legal: The first time you search, you accept that you will only search data you are allowed to investigate. Know your purpose before you start; our legal and ethical guide and introduction to OSINT cover it.
Next steps: run the individual searches in more depth with the email guide and username guide, or try a platform investigation as in the GitHub OSINT guide.
Frequently asked questions
Is the investigation canvas free?
Creating an account is free and comes with 15 credits. Email, username and phone searches use credits (5 per search that finds something, refunded when nothing is found). Lookups for domains, IPs, URLs, wallets, platform accounts and other entity types are free.
Can I use the canvas without an account?
You can open the canvas page and look at an example canvas, but building and saving your own investigation needs a free account.
What can I export from the canvas?
A high-resolution PNG, at 2x, 4x or 8x, with a dark, light or transparent background and either the whole canvas or the current view, and a canvas file in JSON format that you can import again later. Searches that produced a report also offer a PDF download.
Does running a search on the canvas notify the person?
No. Searches and lookups are passive and never contact the person or account being looked up.
How many searches can run at the same time?
Up to three searches or lookups at once. Wait for one to finish before starting another.
Can I undo a mistake?
Yes. Undo and redo are in the toolbar, with Ctrl+Z and Ctrl+Shift+Z, and a rearrange can be undone the same way.
Keep reading
-
 Investigations
OSINT Investigation Workflow: One Email to a Full Picture
A fictional walk-through from one email address to a documented, sourced report, with pivots and link analysis along the way.
-
 Guides
Is OSINT Legal? Ethics and GDPR for Online Investigations
Where the legal and ethical lines run in open source investigations, and the habits that keep your work defensible.
-
 Guides
What Is OSINT? A Practical Introduction
Open source intelligence explained: where the data comes from, how analysts work through it, and where the legal lines are.